

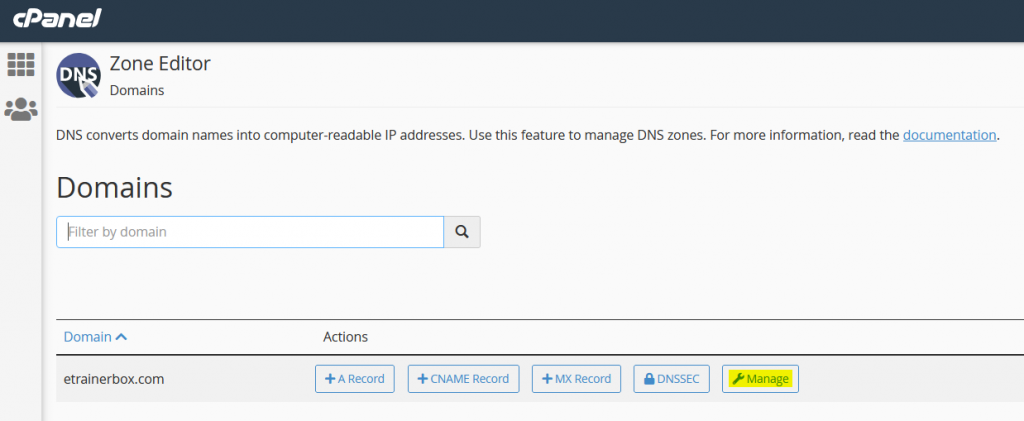
To update the DNS zone of the domain in your cPanel account, follow the steps below.
- Login to your cPanel
- Go to “Domains” section and click on “Zone Editor”

- Then click on “Manage”.
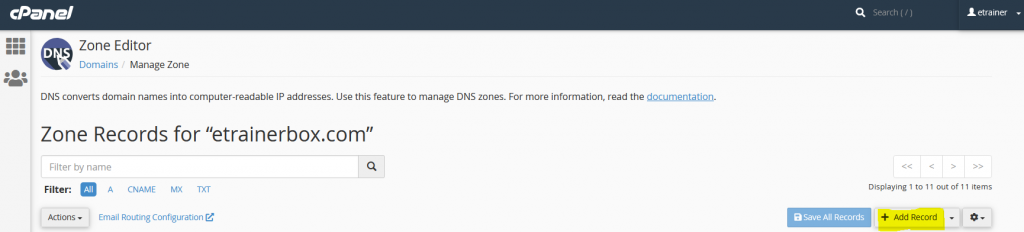
- On the next page, you will have three option:
- Add new records
- edit existing ones
- reset the DNS zone
- If you would like to “Add a New Record” then click on “+A Record”.
Further steps it is depend on the record type which you want to add:
A Record, AAAA Record, CAA Record, CNAME Record, DMARC Record, MX Record, SRV Record, TXT Record.
A Record:
A Record is an Address Record, and it points a domain or subdomain to an IP Address. To add an A record, you may follow the below steps:
- Name: Enter the Domain Name.
- TTL: it must be a positive number (in seconds).
- Type: Select Type “A”
- Record: Enter IP Address
- After fill the all fields, click on “Save Record”

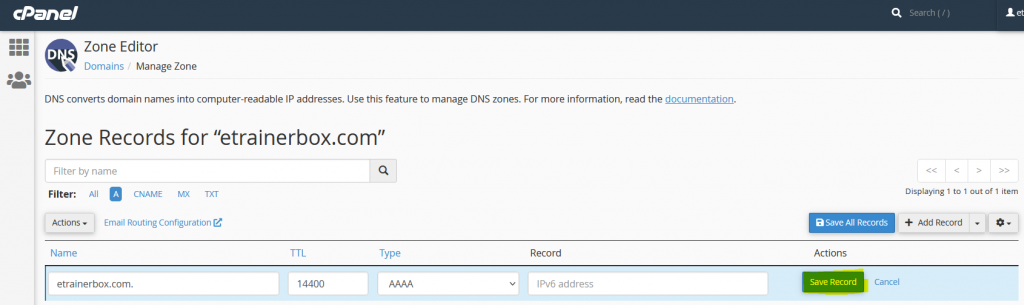
AAAA Record:
AAAA record is also known as “IPv6 address record”, it maps a hostname to a “128-bit IPv6 address” in a Domain Name System which is called “DNS”. To add the AAAA Record, you may follow the below steps:
- Name: Enter the Domain Name.
- TTL: it must be a positive number (in seconds).
- Type: Select Type “AAAA”
- Record: Enter IPv6 Address
- After filling all fields, click on “Save Record”
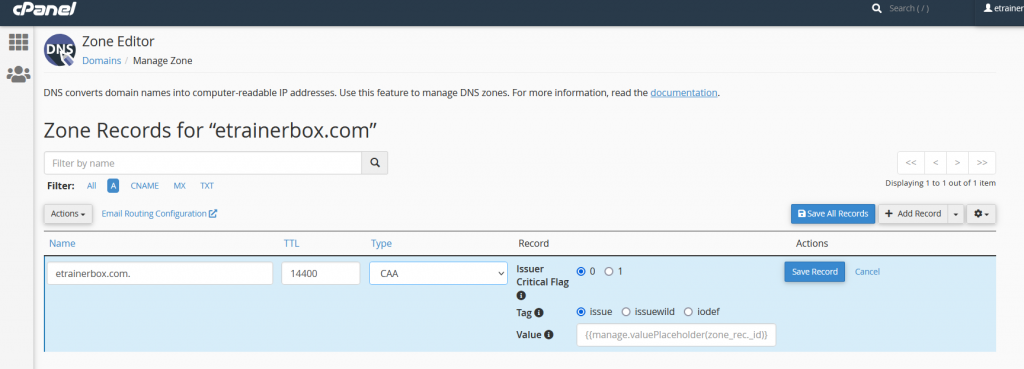
CAA Record
CAA is also known as Certification Authority Authorization record specifies, which CAs (Certificate Authorities) are allowed to issue domain certificates, you may follow the below steps to enter CAA Record:
- Name: Enter the Domain Name.
- TTL: it must be a positive number (in seconds).
- Type: Select Type “CAA”
- Flag: 0 or 1
- Tag: it must be a valid zone name with Issue or Issue Wild tags or Valid mailto or standard URL with iodef tag.
- After filling all fields, click on “Save Record”
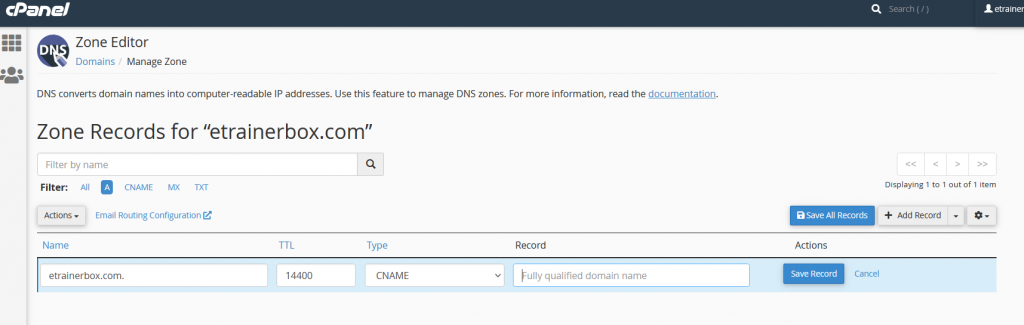
CNAME Record
Canonical Name (CNAME) points one domain/subdomain to another domain name, which allows you to update one “A Record” each time you change, although of how many Host Records require to solve to that IP address. you may follow the below steps to enter CNAME Record:
- Name: Enter the Domain Name.
- TTL: it must be a positive number (in seconds).
- Type: Select Type “CNAME”
- Record: it must be a valid zone name.
- After filling all fields, click on “Save Record”
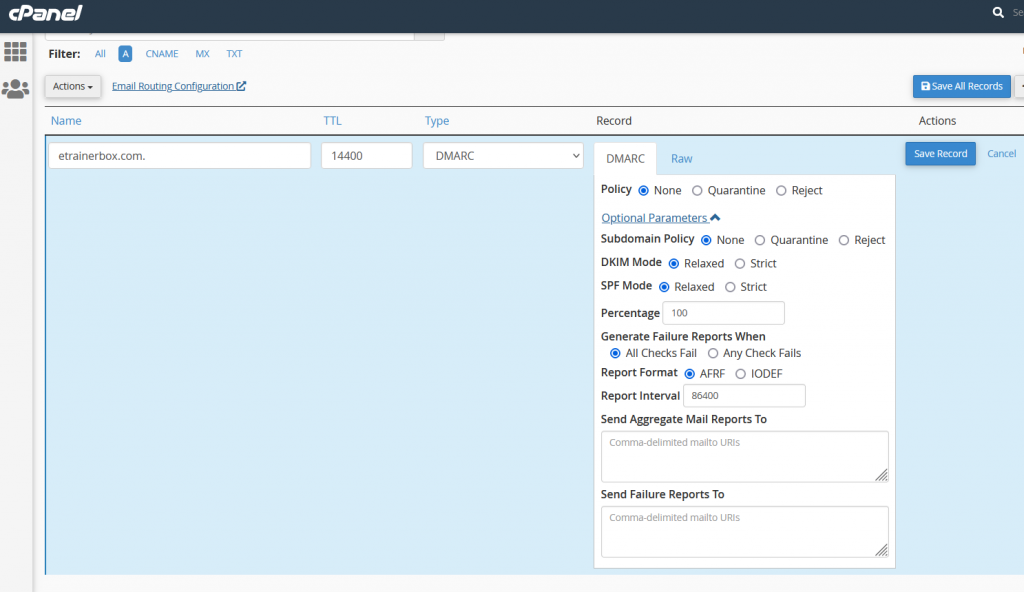
DMARC Record
A Domain-based Message Authentication, Reporting, and Conformance (DMARC) record intimate the performance for a mail server to take when it gets mail from this domain, but that information fails DKIM & SPF checks. To enable the DMARC record, you may follow the below steps:
- Name: Enter the Domain Name.
- TTL: it must be a positive number (in seconds).
- Type: Select Type “DMARC”
| Options | Descriptions | Possible Values |
| 1. Subdomain Policy | The effect that the recipient’s mail server should operate when it receives mail from a subdomain of this domain, but that message fails DKIM & SPF checks. | None — It means, perform no action for spam emails. Quarantine — It means all spam emails sent to different folders. Reject — it means all spam emails will Reject. |
| 2. DKIM Mode | The Domain Keys Recognized Mail at DKIM level that the system will support for the domain. | Relaxed — The system provides some email messages from domains that do not acknowledge. Strict — The system rejects all email messages from domains that it does not recognize. |
| 3. SPF Mode | The SPF (Sender Policy Framework) level that the system will force for the domain. | Relaxed — The system provides some email messages from domains that do not acknowledge. Strict — The system rejects all email messages from domains that it does not recognize. |
| 4. Percentage | The portion of email messages that you want for the system to filter. | An integer value between 0 (Zero) and 100 (Hundred). |
| 5. Generate Failure Reports When | The error reporting policy between the receiver’s mail and sender’s Mail Transfer Agents. | Any fail check — Send a report to both the sender and receiver if any email checks fail. All checks fail — Only send a report to both the sender and receiver if all of the email checks fail. |
| 6. Report Format | The format that the system applies to report an email message’s probable spam status. | IODEF — Incident Object Description Exchange Format. AFRF — Authentication Failure Reporting Format. |
| 7. Report Interval | The value of time, in seconds, that lapse within each email message report. | A positive integer. |
| 8. Send Aggregate Mail Reports To | A comma-delimited record of URIs to which to transfer all email messages report. To sum a size limit for the report, affix an exclamation point, a number, and a file size multiplier to the end of the URI. You can specify the following size multipliers: k — Kilobytes. m — Megabytes. g — Gigabytes. t — Terabytes. | mailto:reports@example.com!60m |
| 9. Send Failure Reports To | A comma-delimited list of URIs to which to assign failure email message reports. | mailto:reports@example.com!60m |
PLEASE NOTE: If you do not define a true parameter, the system will not save the parameter when you build the record.
- After completed all required information, click on “Save Record”.
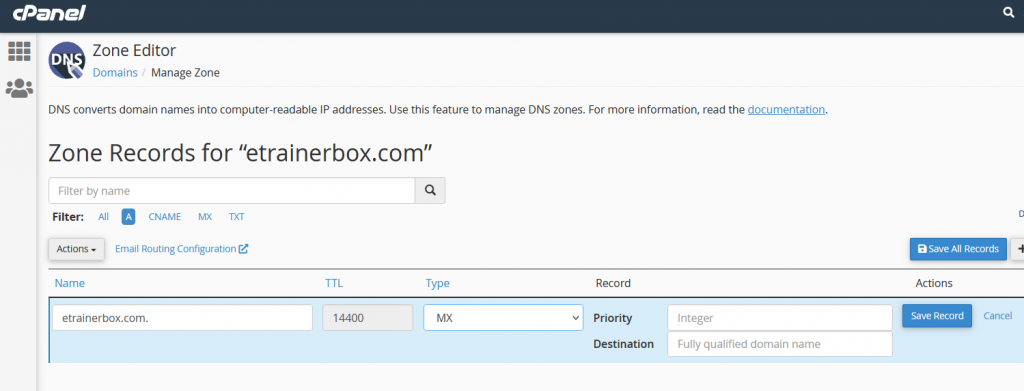
MX Record
A Mail Exchanger (MX) record defines a mail server capable of accepting email messages on behalf of a domain. This record is necessary for email delivery. To add the MX Record, you may follow the below steps:
- Name: Enter the Domain Name.
- TTL: it must be a positive number (in seconds).
- Type: Select Type “MX”
- Priority: Lower value more preferred and must be an integer.
- Destination: Must be valid zone name
- After filling all fields, click on “Save Record”
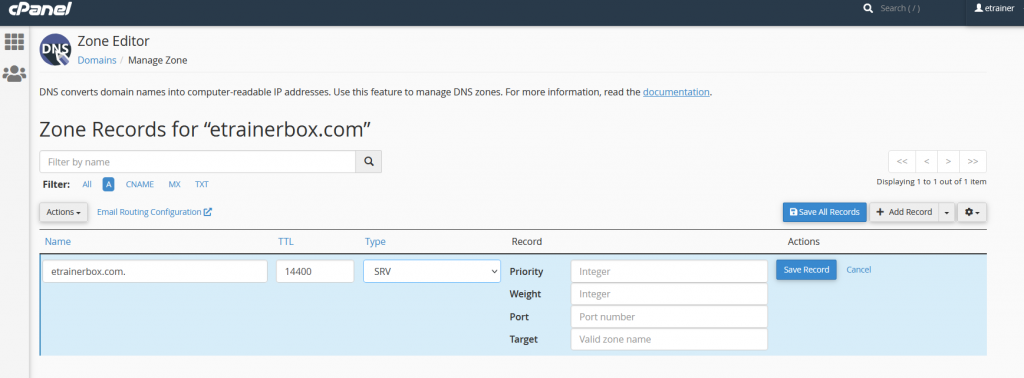
SRV Record
An SRV record points one domain to another domain name using a specific destination port. To add the SRV record, you may follow the below steps:
- Name: Enter the Domain Name [Covers the service and protocol (the Protocol used by the service, usually either TCP or UDP].
- TTL: it must be a positive number (in seconds).
- Type: Select Type “SRV Record”
- Priority: It should be the target host, lower values more preferred.
- Weight: comparative weight for records with the related priority, a higher value means a more preferred one.
- Port: UDP or TCP port on which the service is to be found
- Target: The authoritative hostname of the machine presenting the service, ending in a dot.
- After filling all fields, click on “Save Record”
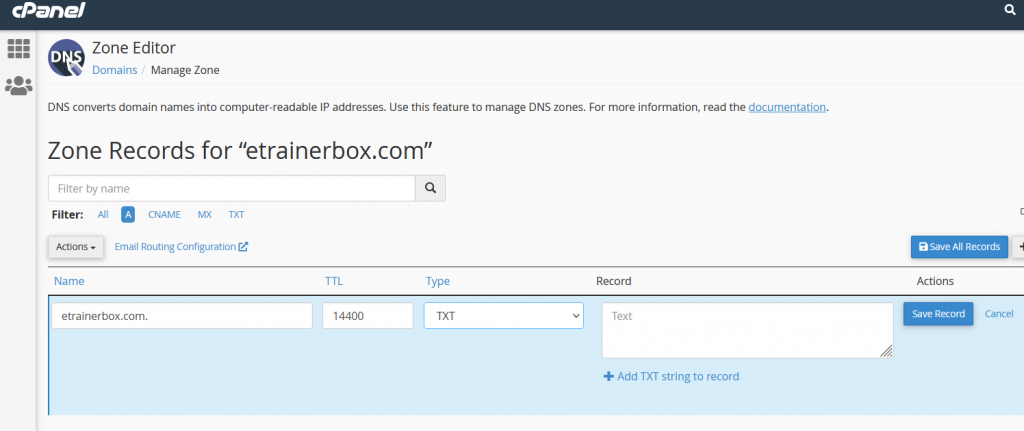
TXT Record:
These records contain a free-text form of any type. A completely qualified domain may have multiple TXT records. The most frequent uses for TXT records are SPF (Sender Policy Framework), DK (DomainKeys), DomainKeys Identified E-mail (DKIM). TXT records historically have also been practiced to hold human-readable information about a server, network, data center, and other accounting information. To add TXT record, you may follow the below steps:
- Name: Enter the Domain Name. Example: domainname.com
- TTL: it must be a positive number (in seconds). Example: 1400
- Type: Select Type “TXT”
- Record: It cannot be empty or it can not be more than 2500 symbols. Example: v=spf1 + a +mx +ip4: 192.187.30.8 ? all
- After filling all fields, click on “Save record
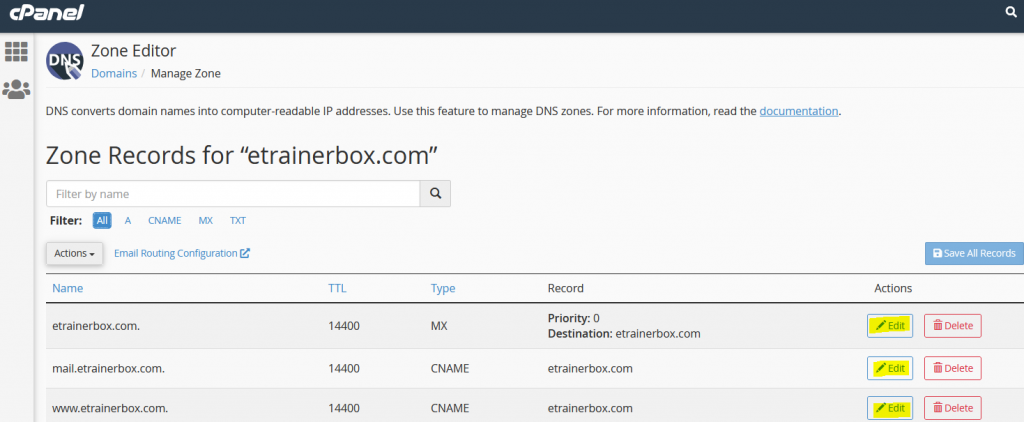
To edit the current records, Please choose that specific record that you need to edit from the list of existing DNS. Then, Click on “Edit”, and after entering the required values, click on “Save Record” to save changes.
Hopefully, this article will help you. If you have any question, you can ask in the comments.


